Imagine yourself out on a beautiful sunny day, casting your fishing line into the calm waters. You patiently wait, hopeful for a good catch, but often find yourself wondering where all the fish are hiding. With “Fish Finder 101: An Introduction to Modern Fish Locating Technology,” you can put those thoughts to rest. This handy device uses cutting-edge technology to scan the depths of the water, locating and displaying the positions of fish in real-time. No more guessing or relying on luck, this article will introduce you to the incredible world of fish finding technology and how it can revolutionize your fishing experience.
1. Understanding Fish Finders
1.1 How Fish Finders Work
Fish finders are electronic devices used by fishermen to locate and identify fish underwater. They work by emitting sonar signals into the water, which then bounce back when they hit an object, such as a fish or the bottom of the water body. The fish finder then analyzes the returned signals and displays them on a screen, allowing the user to see the location and depth of the fish.
The basic principle behind fish finders is the use of sound waves to create a detailed image of what lies beneath the surface of the water. The sonar signals emitted by the fish finder travel through the water at a speed of approximately 1,500 meters per second. When these signals encounter an object, they bounce back to the fish finder, creating a sonar return. By analyzing the strength and timing of these returns, the fish finder can determine the distance, size, and location of the fish.
1.2 Benefits of Using Fish Finders
Using a fish finder can greatly enhance your fishing experience and increase your chances of success. Here are some key benefits of using fish finders:
- Increased Fish Catch: By accurately identifying the location of fish, fish finders can help you target your efforts in areas where fish are more likely to be present, leading to higher catch rates.
- Time and Energy Efficiency: Fish finders allow you to quickly locate fish, saving you time and energy that would otherwise be spent searching for fish in unproductive areas.
- Depth and Structure Information: Fish finders provide valuable information about the depth of the water and the underwater structure, such as rocks, weeds, and drop-offs. This information can help you determine the best fishing spots and increase your chances of success.
- Adaptability: Fish finders can be used in various fishing environments, including freshwater lakes, rivers, and even in saltwater. They are versatile tools that can be used by both recreational and professional anglers.
1.3 Types of Fish Finders
Fish finders come in a variety of types, each with its own set of features and capabilities. The three main types of fish finders are:
- Standalone Fish Finders: These fish finders consist of a display unit and a transducer. They are typically mounted on the fishing boat and provide basic fish-finding functions.
- Portable Fish Finders: As the name suggests, portable fish finders are compact and lightweight units that can be easily carried and used in different fishing locations. They are ideal for anglers who fish from kayaks, canoes, or small boats.
- Networked Fish Finders: Networked fish finders can be connected to other marine electronics, such as GPS systems, radar, and chartplotters. This allows for seamless integration and sharing of information between different devices, providing a more comprehensive fishing experience.
1.4 Key Components of a Fish Finder
To understand how fish finders work, it is important to familiarize yourself with their key components:
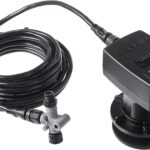
- Transducer: The transducer is the heart of a fish finder. It emits sonar signals and receives the returning echoes, providing the necessary information for fish detection.
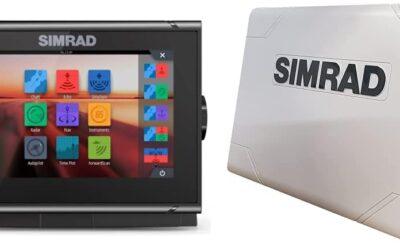
- Display Unit: The display unit is where the sonar readings are displayed. It shows the location, depth, and size of the fish, as well as other important information such as water temperature and bottom contours.
- Power Source: Fish finders are powered either by batteries or by the boat’s electrical system. It is important to ensure that you have a reliable power source to keep your fish finder running during your fishing trips.
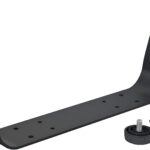
- Mounting System: Fish finders need to be securely mounted on the boat or kayak to ensure stability and accurate readings. Mounting systems vary depending on the type of fish finder and the type of watercraft.
- User Interface: Fish finders come with different user interfaces, including buttons, touchscreens, and keypads. It is important to choose a user interface that is intuitive and easy to navigate for a seamless fishing experience.
2. Transducers: The Heart of a Fish Finder
2.1 Introduction to Transducers
Transducers are the essential component of a fish finder that allows it to emit and receive sonar signals. These devices convert electrical energy into sound waves and vice versa. The transducer emits a series of sound waves into the water, which then travel through the water and bounce back when they encounter an object. The returning echoes are picked up by the transducer and converted into electrical signals that are then displayed on the fish finder’s screen.
The performance and quality of the transducer directly impact the accuracy and clarity of the sonar readings. It is crucial to choose the right transducer for your fishing needs to ensure optimal results.
2.2 Different Types of Transducers
There are several types of transducers available, each with its own unique characteristics and applications. The three most common types of transducers are:
- Traditional Transducers: These transducers emit sound waves in a single beam, providing a narrow but detailed view of the underwater environment. They are best suited for shallow water fishing and are less effective in deeper water.
- Broadband Transducers: Broadband transducers emit a wide range of frequencies, allowing for a broader coverage area. They are capable of providing both high-resolution images and a wider viewing angle, making them suitable for various fishing environments.
- CHIRP Transducers: CHIRP (Compressed High-Intensity Radiated Pulse) transducers use a unique technology that emits a continuous range of frequencies, providing more detailed and accurate sonar readings. They offer better target separation and are highly effective in both shallow and deep water.
2.3 Selecting the Right Transducer for Your Needs
Choosing the right transducer can significantly enhance your fish finding capabilities. Here are a few factors to consider when selecting a transducer:
- Fishing Environment: Consider the depth and type of water you will be fishing in. If you primarily fish in shallow water, a traditional transducer may be sufficient. However, if you fish in a variety of depths, a broadband or CHIRP transducer would be more suitable.
- Frequency Range: Transducers operate at different frequency ranges, and each range has its own advantages. Higher frequencies provide detailed images and are effective in shallow water, while lower frequencies are better for deeper water and can penetrate through dense vegetation and structure.
- Transducer Type: Decide whether you need a through-hull transducer, which is installed through the bottom of the boat, or a transom-mount transducer, which is mounted on the outside of the boat. The type of watercraft you have and your personal preferences will determine the most suitable option.
- Compatibility: Ensure that the transducer you choose is compatible with your fish finder model. Not all transducers work with all fish finders, so it is important to check the specifications and compatibility requirements before making a purchase.
Selecting the right transducer for your fish finder is crucial in maximizing its performance and accuracy. Take the time to research and consider your specific fishing needs to make an informed decision.
3. Display Units: Decoding the Sonar Readings
3.1 Importance of Display Units
While transducers are responsible for transmitting and receiving sonar signals, the display unit is where the sonar readings are decoded and presented to the user. The quality of the display unit plays a crucial role in providing clear and accurate sonar images, allowing you to easily interpret and understand the underwater environment.
A high-quality display unit should have a high pixel resolution, a large screen size, and features such as color enhancement and adjustable brightness. These factors contribute to a more detailed and visually appealing representation of the sonar readings, making it easier for you to identify fish and underwater structures.
3.2 Types of Display Units
Fish finder display units come in various types and sizes, each offering different features and functionalities. The three most common types of display units are:
- Monochrome Display: Monochrome displays are simple and affordable options that provide black and white images. While they may lack the visual appeal of color displays, monochrome units are still capable of providing clear and detailed sonar readings.
- Color Display: Color displays offer a more vibrant and detailed representation of the sonar readings. They use different colors to distinguish between fish, structures, and the bottom of the water body, making it easier for you to interpret the information.
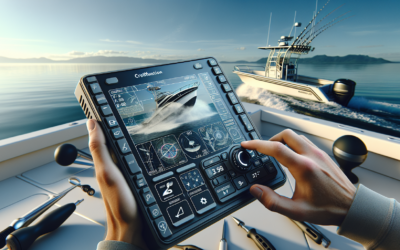
- Touchscreen Display: Touchscreen displays provide a user-friendly interface that allows for easy navigation and control of the fish finder’s settings. They offer a more intuitive and interactive experience, making it convenient to adjust various parameters and features.
The choice of display unit depends on personal preferences, budget constraints, and the level of detail required for your fishing needs. Color displays, especially those with higher pixel resolutions, are generally recommended for a more comprehensive fish-finding experience.
3.3 Understanding Sonar Readings on the Display
Interpreting sonar readings displayed on the fish finder’s screen can initially seem overwhelming, but with a basic understanding of the key elements, it becomes much simpler. Here are some important aspects to consider when analyzing sonar readings:
- Fish Arch: When a fish swims through the sonar beam, it creates an arch-shaped image on the display. The size and shape of the arch can give you an idea of the size and species of the fish.
- Bottom Contour: The bottom contour refers to the shape and composition of the underwater terrain. It appears as a line or series of lines on the display, depicting changes in depth and structure.
- Fish Symbols: Some fish finders have the capability to automatically detect and display fish symbols on the screen. Each symbol represents the presence of a fish and may vary in size and shape, usually in relation to the size of the fish.
- Water Temperature: Many fish finders display the water temperature on the screen. Water temperature can greatly influence fish behavior and migration patterns, providing valuable insights into their whereabouts.
- Depth Indicator: The depth indicator shows the depth at which the fish finder is currently operating. It helps you determine the water depth and locate potential fishing spots.
By familiarizing yourself with these key elements, you can effectively interpret the sonar readings displayed on the fish finder’s screen, enabling you to make informed decisions and increase your fishing success.
4. Frequency and Cone Angle: Deciphering the Technicalities
4.1 Explaining Frequency
Frequency is an important factor to consider when using a fish finder, as it determines the resolution and the depth at which the sonar signals can effectively penetrate. Frequency is measured in kilohertz (kHz) and refers to the number of sound waves emitted or received by the transducer per second.
Low-frequency transducers operate at frequencies between 50 kHz and 83 kHz. These frequencies are suitable for deep water fishing, as they can effectively penetrate through water and give accurate readings at greater depths. However, they may not provide as much detail as higher frequencies.
High-frequency transducers, on the other hand, operate at frequencies between 192 kHz and 200 kHz. They excel at providing detailed images and are ideal for shallow water fishing. However, their effectiveness decreases as the depth increases, making them less suitable for deep water applications.
4.2 Understanding Cone Angle
Cone angle refers to the width of the sonar signal emitted by the transducer. It is measured in degrees and determines the coverage area of the sonar beam. A wider cone angle covers a larger area but provides less detail, while a narrower cone angle offers a more focused and detailed view of a smaller area.
Wide cone angles, typically ranging from 20 to 60 degrees, are preferred for shallow water fishing, as they allow for a broader coverage area and help locate fish near the surface. Narrow cone angles, ranging from 10 to 20 degrees, are more suitable for deeper water fishing, where a narrower focus is needed to accurately identify fish and structures at greater depths.
4.3 Finding the Optimal Frequency and Cone Angle
Determining the optimal frequency and cone angle depends on your fishing preferences and the type of water body you are fishing in. Here are some points to consider when choosing the right frequency and cone angle for your fish finder:
- Fishing Environment: If you primarily fish in deep water, a low-frequency transducer with a wide cone angle would be more suitable. If you fish in shallow water, a high-frequency transducer with a wider cone angle can provide better coverage.
- Target Species: Certain fish species prefer different water depths. Research the behavior and habitat preferences of your target species to determine the appropriate frequency and cone angle that would best suit your fishing needs.
- Combination Transducers: Some transducers offer a dual or multiple frequency capability, allowing you to switch between frequencies depending on the fishing situation. These transducers provide versatility and adaptability to various fishing environments.
Experimenting with different frequency settings and cone angles can help you find the optimal combination that provides the best results for your specific fishing needs. It is recommended to start with the manufacturer’s recommended settings and make adjustments based on your preferences and fishing conditions.
5. GPS and Mapping: Enhancing Your Fishing Experience
5.1 The Role of GPS in Fish Finders
Global Positioning System (GPS) technology has revolutionized the way we navigate and explore the world, including our fishing activities. In the context of fish finders, GPS technology allows for accurate positioning and navigation on the water, providing a wide range of benefits for anglers.
GPS allows you to mark and save waypoints, which are specific locations of interest, such as productive fishing spots or underwater structures. These waypoints can be easily revisited in the future, eliminating the need to rely on memory or manual navigation techniques. GPS also enables you to track your path and create a breadcrumb trail, giving you a visual representation of your fishing route.
5.2 Benefits of GPS and Mapping Features
The integration of GPS and mapping features with fish finders offers numerous advantages for anglers:
- Location Precision: GPS technology provides precise location information, allowing you to navigate with confidence and reach your desired fishing spots accurately.
- Efficient Route Planning: By studying maps, you can plan your fishing trips more efficiently, taking into account factors such as depth, underwater structures, and potential fish-holding areas. This saves time and increases your chances of success.
- Waypoint Management: GPS-enabled fish finders allow you to mark and save waypoints at specific spots, such as favorite fishing locations, schools of fish, or submerged structures. You can easily revisit these waypoints in the future, ensuring consistent and productive fishing experiences.
- Mapping Capabilities: Fish finders with mapping features provide detailed underwater maps, displaying contours, depth, and structure information. These maps help you understand the topography of the water body and make informed decisions about fishing locations.
5.3 Using GPS and Mapping to Your Advantage
To fully leverage the benefits of GPS and mapping features, consider the following tips:
- Pre-Plan Your Fishing Trips: Before heading out, study maps and identify potential fishing spots based on depth, structure, and other relevant factors. Mark these spots as waypoints on your fish finder for easy navigation.
- Combine Sonar and GPS Data: By overlaying sonar readings on the map, you can create a more holistic view of the underwater environment. This allows you to further analyze fish behavior and identify patterns.
- Follow Breadcrumb Trails: Take advantage of the breadcrumb trail feature to track your fishing path. This can be useful when exploring new areas or when you want to retrace your successful fishing routes.
- Update Your Maps: As technology advances, so do the available mapping software and updates. Regularly update your fish finder’s mapping software to ensure that you have access to the latest cartographic data and features.
Integrating GPS and mapping features with your fish finder not only enhances your fishing experience but also increases your overall knowledge and understanding of the water body, improving your chances of success.
6. Advanced Features: Taking Fish Finding to the Next Level
6.1 Advanced Imaging Technologies
Recent advancements in fish finder technology have led to the development of advanced imaging technologies that provide even more detailed and realistic underwater views. Some of these technologies include:
- Down Imaging: Down Imaging technology uses high-frequency sonar beams to create detailed images of the underwater environment directly beneath the boat. It provides a clear view of structures, vegetation, and fish, allowing for easier identification.
- Side Imaging: Side Imaging technology emits sonar beams to the sides of the boat, creating detailed images of the underwater terrain. It offers a wider coverage area and helps identify fish and structures that may not be directly beneath the boat.
- Real-Time Scanning: Real-time scanning, also known as Live Imaging, provides a continuous and dynamic view of the underwater environment. It allows you to see fish movements, changes in structure, and other underwater activities in real-time, enhancing your ability to react and adjust your fishing strategy accordingly.
6.2 Networking Capabilities
Fish finders with networking capabilities offer a wide range of additional features and functionalities by allowing them to connect with other marine electronics. Some common networking capabilities include:
- NMEA 2000: NMEA 2000 is a communication protocol that enables different marine electronics to exchange data seamlessly. It allows for integration between fish finders, GPS systems, chartplotters, and other devices, providing a more comprehensive and interconnected fishing experience.
- Wireless Connectivity: Some fish finders offer wireless connectivity options, allowing you to connect to your smartphone, tablet, or other compatible devices. This enables you to control and monitor your fish finder remotely, update software, and share data with other anglers.
- Multi-Screen Displays: High-end fish finders often feature multi-screen displays that allow you to view multiple sonar views simultaneously. This can be useful for monitoring different areas, comparing sonar readings, or utilizing various imaging technologies simultaneously.
6.3 Integration with Other Marine Electronics
The ability to integrate fish finders with other marine electronics enhances their functionality and makes your fishing experience more productive. Some examples of integration possibilities include:
- Chartplotters: By integrating a fish finder with a chartplotter, you can overlay sonar readings onto detailed nautical charts, giving you a comprehensive view of the underwater environment and your position on the water.
- Radar: Integration with a radar system provides additional safety and navigation capabilities, allowing you to detect and avoid obstacles, track other vessels, and navigate through low-visibility conditions.
- Auto-Steering Systems: Some fish finders and GPS systems can integrate with auto-steering systems, enabling precise and automated navigation. This frees up your hands for fishing while maintaining your course or following a predetermined path.
The advanced features and networking capabilities of modern fish finders significantly enhance your fishing experience, provide valuable insights, and ultimately increase your chances of success on the water.
7. Installation and Setup: Getting Your Fish Finder Ready
7.1 Preparing for Installation
Before installing your fish finder, it is important to gather all the necessary tools and materials. Here are some steps to prepare for installation:
- Read the Manual: Familiarize yourself with the instruction manual provided by the manufacturer. This will help you understand the specific requirements and recommendations for your particular fish finder model.
- Choose a Mounting Location: Select a suitable location on your boat to mount the fish finder display unit. Ensure that it is easily accessible and provides a clear view of the screen while you are operating the boat.
- Gather the Necessary Tools: Depending on the mounting system and installation requirements, gather the required tools, such as a drill, screwdrivers, wrenches, and other hardware.
- Determine Transducer Placement: Decide whether you will be using a through-hull or transom-mount transducer. If using a through-hull transducer, identify a suitable location on the boat’s hull that is free of obstructions and readily accessible underwater. If using a transom-mount transducer, determine the optimal location and angle on the transom for the best sonar performance.
7.2 Mounting the Transducer
Proper transducer installation is essential for accurate sonar readings and optimal fish finder performance. Follow these steps for a successful transducer installation:
- Read the Manual: Consult the fish finder’s instruction manual for specific instructions on transducer installation. Each fish finder model may have slight differences in installation requirements.
- Prepare the Transducer: Ensure that the transducer and its cable are in good condition, free of any cracks or damage. Trim the cable to the desired length, leaving some slack to avoid strain on the connections.
- Choose the Transducer Location: If using a through-hull transducer, choose a suitable location on the hull that is free of obstructions. If using a transom-mount transducer, select a location that provides an unobstructed view of the water and maintains a constant depth in the water.
- Install the Transducer: Follow the manufacturer’s instructions to install the transducer securely. Use the appropriate mounting hardware and sealing compounds to ensure a watertight installation.
7.3 Connecting and Configuring the Display Unit
Once the transducer is properly installed, it is time to connect and configure the fish finder’s display unit. Follow these steps for a successful setup:
- Connect the Transducer: Connect the transducer cable to the display unit according to the manufacturer’s instructions. Ensure that the connections are secure and that the cable is properly routed to avoid any damage or interference.
- Power the Display Unit: Connect the display unit to a reliable power source, such as the boat’s electrical system or a separate battery. Follow the manufacturer’s instructions for the correct power connection.
- Configure the Settings: Power on the display unit and follow the on-screen instructions to configure the settings according to your preferences. Set the language, units of measurement, and sonar frequency as required.
- Test and Calibrate: Once the settings are configured, test the fish finder by powering it on and observing the sonar readings. Make any necessary adjustments to the sensitivity, depth range, and other settings to ensure accurate and clear sonar images.
Following these installation and setup procedures will ensure a successful integration of your fish finder into your fishing setup, allowing for an enhanced fishing experience.
8. Tips and Techniques: Maximizing the Potential of Your Fish Finder
8.1 Understanding Fish Behavior
While fish finders provide valuable information about the location and depth of fish, understanding fish behavior can further optimize your fishing success. Consider the following tips:
- Learn seasonal patterns: Different fish species exhibit specific behaviors based on the time of year. Study the behaviors and migration patterns of your target species to determine the best fishing times and locations.
- Consider water temperature: Fish have specific temperature preferences. By analyzing the water temperature data provided by your fish finder, you can identify areas where fish are likely to gather based on their preferred temperature range.
- Observe fish movements: Use your fish finder’s real-time scanning or down imaging capabilities to monitor fish movements in real-time. This can help you identify feeding patterns, locate schools of fish, and adjust your fishing techniques accordingly.
8.2 Interpreting Sonar Returns
Learning to interpret sonar returns accurately is essential for effective fish finding. Consider the following tips to improve your interpretation skills:
- Study the manual: Familiarize yourself with the different sonar return patterns and symbols specific to your fish finder. The manufacturer’s manual will provide detailed explanations and illustrations.
- Compare different readings: Take note of the differences in sonar returns between fish, structures, and the bottom. Over time, you will develop a better understanding of how different objects and fish are represented on the screen.
- Consider depth and structure: Pay attention to how depth and underwater structure affect sonar returns. Fish may seek shelter near structures or change their depth depending on various factors.
8.3 Mastering Different Fishing Techniques
A fish finder is a versatile tool that can be used in various fishing techniques. Here are some techniques you can explore to maximize the potential of your fish finder:
- Trolling: Use your fish finder to locate schools of fish or structures while trolling. Adjust the depth and lure presentation based on the sonar readings to effectively target fish.
- Vertical Jigging: Vertical jigging involves dropping your lure directly beneath the boat and allowing it to reach the desired depth. Use the fish finder to identify the depth at which the fish are located, and adjust your jigging technique accordingly.
- Casting and Retrieving: When casting and retrieving, utilize your fish finder’s real-time scanning or down imaging features to locate fish or structures. Cast your lure towards those areas and vary your retrieval speed and technique based on the sonar readings.
By combining your fish finder with different fishing techniques, you can adapt to different fishing conditions and increase your chances of success on the water.
9. Maintenance and Troubleshooting: Keeping Your Fish Finder in Top Shape
9.1 Regular Maintenance Practices
Regular maintenance is essential to keep your fish finder in optimal condition. Follow these maintenance practices to ensure its longevity:
- Clean the Display: Regularly clean the display unit using a soft, non-abrasive cloth. Avoid using harsh chemicals or abrasive materials that could damage the screen.
- Remove Moisture: If your fish finder is exposed to water or condensation, remove any moisture promptly. Use a soft cloth to wipe off any water and ensure that the unit is completely dry before further use.
- Check Connections: Periodically inspect the connections between the transducer, display unit, and power source. Ensure that all connections are secure and free of corrosion or damage.
- Protect from UV Rays: If your fish finder is exposed to sunlight for extended periods, consider using a cover or sunscreen to protect it from UV rays. Prolonged exposure to sunlight can damage the display and reduce its lifespan.
9.2 Troubleshooting Common Issues
If you encounter any issues with your fish finder, here are some common troubleshooting steps to follow:
- Check Power: Ensure that the fish finder is properly connected to a power source and that the battery or electrical system is providing sufficient power.
- Test Transducer Connection: Inspect the transducer connection to ensure it is securely attached to the display unit. Check for any signs of damage or corrosion.
- Reset Settings: If the display is not functioning correctly, try resetting the settings to the factory defaults. Consult the instruction manual for specific instructions on how to perform a reset.
- Update Software: If the fish finder has software capabilities, check for any available updates. Updated software can often resolve bugs and improve performance.
If the issue persists or you are unable to identify the problem, contact the manufacturer’s customer support for further assistance.
9.3 Extending the Lifespan of Your Fish Finder
To prolong the lifespan of your fish finder, consider the following tips:
- Proper Storage: When not in use, store your fish finder in a cool, dry place. Avoid exposing it to extreme temperatures or high humidity, as this can damage the internal components.
- Secure Mounting: Ensure that the fish finder is securely mounted to prevent unnecessary movement or vibrations that could lead to damage.
- Regular Updates: Keep your fish finder’s software up to date by regularly checking for any available updates. Updated software often improves performance and adds new features.
- Follow Manufacturer’s Recommendations: Follow the manufacturer’s recommendations for care, maintenance, and operational guidelines. This will help you use the fish finder in a manner that maximizes its lifespan and performance.
By following these maintenance practices and troubleshooting tips, you can keep your fish finder in top shape and ensure reliable performance throughout its lifespan.
10. Choosing the Right Fish Finder for You
10.1 Considering Your Fishing Needs
Choosing the right fish finder is essential to ensure that it meets your specific fishing requirements. Consider the following factors when selecting a fish finder:
- Fishing Environment: Determine the type of water bodies you frequently fish in, such as lakes, rivers, or saltwater. Some fish finders are better suited for specific environments, so selecting one that matches your fishing environment is crucial.
- Depth Range: Consider the depth at which you typically fish. If you fish in shallow water, a fish finder with high-frequency capabilities may be more suitable. For deeper water fishing, a model with low-frequency capabilities would be preferable.
- Targeted Fish Species: Different fish species have specific behaviors and habitat preferences. Research the fish species you frequently target and choose a fish finder that can help you locate and understand their behavior.
10.2 Budget and Features
When it comes to fish finders, there is a wide range of options available at various price points. Consider your budget and the features that are important to you. Some features you may want to consider include:
- Sonar Imaging Technologies: Determine if you require advanced imaging technologies such as down imaging or side imaging. These features provide more detailed and realistic sonar images but may come at a higher cost.
- GPS and Mapping: Decide if integrating GPS and mapping features is important for your fishing style. These features can greatly enhance your fishing experience but may increase the overall cost of the fish finder.
- Networking Capabilities: Consider if you need networking capabilities to connect your fish finder with other marine electronics. While these capabilities offer additional features and functionalities, they may also come at a higher price.
- Display Quality: Evaluate the display quality and resolution. A high-resolution display provides clearer and more detailed sonar images but may come at a higher cost.
10.3 Researching and Comparing Different Models
Before making a final decision, thoroughly research and compare different fish finder models. Consider reading online reviews, consulting with experienced anglers, and visiting local retailers. Take the time to compare the specifications, features, and price points of different models to find the one that best suits your needs and budget.
Remember, choosing the right fish finder is an investment in your fishing experience. By selecting a model that aligns with your fishing needs and preferences, you can significantly enhance your chances of success on the water.